Showing posts with label 3dprinting. Show all posts

Thursday, March 20, 2025

Forgetting to check the bed adhesion and end up getting a filament blob

So the other day I was trying to print this nifty funnel for Mokka pots - Mokka Pot Buddy from printables.com.  It's a fairly simple design, has multiple uses and stores in the mokka pot.


I just tossed it into BambuStudio, sliced the plate and hit print.


I mean it looks pretty straight forward what could go wrong?  


Plenty it turns out.  The bed adhesion wasn't good enough and the print came loose and stuck to the nozzle - much worse than getting spaghetti but at least this time it didn't consume the nozzle entirely like it did in my worst print failure I've ever had. It separated from the nozzle relatively cleanly - I had to scrape some extra gunk off and it had some extrusion issues on my next attempt but shortly thereafter it was back to normal.  

Turns out I didn't look at the sliced file and I should have.  If you look at the first few lines of the sliced file, you see that there are only two walls of filament touching the bed.  None of the inner parts, they're floating above the bed.  


So as we get taller the forces exerted on that thin connection with the bed just lets go.  By turning on supports the print was able to come out just fine.  Lesson learned - check how much of the print is actually touching the bed. 


Monday, July 29, 2024

Accidental 3d printing art

 Every once and a while a print goes wrong and turns into a piece of art unto itself.


This is the print I'm trying to slice and print.  Nothing too crazy about it, except there isn't a lot of bed adhesion.  Add to that PETG's tendency to clump and string when not perfectly dry and you've got a recipe for a failed print.


The print looked kinda neat once I took it off the plate though.


Thursday, July 25, 2024

BBr2 from Michael Baddeley's patreon on my new BambuLabs P1S

For last christmas, on a whim I decided to print a BBr2 (BaByR2) from a patreon I subscribe to: Michael Baddeley (I'm also printing a full size R2, more on that in another post).

So I sold all my camera gear and used the money to buy a BambuLabs P1S with AMS filament changer.  It is an excellent printer.  If you can afford one, get one.  Even the P1P would be a great printer to get.  Speed and quality in a single package that isn't "Prusa" expensive. 


The body came out great on the first try.


The dome prints very well without supports. 


 Printed two legs, some tires and a center foot and it was time to assemble. 


It's a very easy print and pretty easy to assemble with some screws and superglue.  It takes 3 servo motors and somethign to control them.  Since this was my first attempt I went simple with a FlySky FS-I6 from amazon. 


I initially printed the oversized "cartoonish" dome.  I just picked the default dome from the file list.  After gluing and assembling I wired it up to an adafruit crickit to test the dome.  Adafruit makes it super easy to control servos, especially when you're just testing things out. 


I later found the holiday themed dome.  I had some red filament laying around from a previous project idea so it seems a perfect time to test out the AMS.  Turned out excellent!  I bought some "metalic" paint markers from a craft store and started coloring the white in.  


*EDIT/UPDATE* - found the time lapse footage for the Santa hat print:


The AMS does create a lot of waste with the filament changes however:


Later I went back and printed a classic dome in gray PLA and colored it in (still have some more to do)


Super fun project, glad I spent the time on it. Wish I had better hand/eye coordination to paint it better.


Tuesday, July 23, 2024

3d printed Chewbacca Bowcaster


Catching up on my posting - last year I printed myself a Bowcaster for my Chewbacca costume.

The costume was pretty simple.  It started with a onesie I bought at target a while back on a whim.  I added the talking Chewbacca mask and it was pretty much done.  All I needed was the bowcaster.


I found some STLs on Etsy Designed by MysteryMakersStudio - Custom digital DIY Bowcaster with stand stl file(digital download) and I was off and running.   As an aside, Marko Makaj, the designer has a reasonably well priced patreon  as well if you want more than just one model.  It's important to note it's makers plural.

Anyway was off and printing on my new Ender-3 Max Neo 3D Printer.  I don't think I mentioned that yet - should probably post about it too.   I bought it because I wanted the large build area 300x300 and the NEO line with the SonicPad was supposed to be a game changer.  Meh. It prints.


The parts all came out pretty good.


Next came all the gluing.  So. Much. Gluing.   It went together pretty well.  The polarizers (the balls on the end) are a bit heavy for how thick the actual bows are.  I managed drop it and break them off more than once.


One of the tricks I tried in this build was to use UV Resin from my resin printer to fill in the layer lines.  It's very effective but smells pretty bad when you cure it with the UV flashlight. 


fully assembled! (It did drive me to drink.  A little Smith and Cross rum there on the table).


One of the resin printed lenses cracked when I took it off the plate.  I left it as is for "authentic battle damage!"


Primed.  I later used rattle-can gloss black and then some Rub and Buff silver to to make it look metalic.  Came out good enough for me.  


Lots of lessons learned, could do a lot better if I did it all over again.  Now I just need a place to store this bad boy.


Saturday, January 6, 2024

Redoing my lightsaber

 The good folks at Adafruit made a revision to the feather wing light saber. based on their PropMaker RP2040.

The original:

orignal

 The Lightsaber Prop-Maker RP2040 is much smaller and fits better in the hands.


side by side

The single feather requires a lot less room than the stacked feather and prop maker feather wing.  I was able to re-use the blade and neopixel strip from the first build.  So I only had to get the prop maker rp2040 and the speaker. 


It worked pretty good straight away


The odd lighting at the end of the saber is from the code not being configured with the right pixel count.


Wednesday, November 30, 2022

The worst 3d printer fail I've ever had

 So this is worst printer fail I've ever had:

3d printer blobs of plastic

It looks like I was printing grapes or corn smut (the fungus use of the word smut that's a google images search). The print must failed fairly early in the job and enveloped the entire print head and heat block.  Luckily it didn't block the cooling fan.   

Initially I tried heating the nozzle to see if it might pull of somehow but it was wrapped around too tightly.  it got loose and I could wiggle it but not much more.  Next I tried my heat gun.  That was effective on softening the blobs but it was also softening the 3d printed parts of the print head carriage.  Yikes! 

The thing that ended up working is putting a blade shaped tip on my soldering iron and essentially cutting my into the blobs and hacking it off piece by piece.  I was able to get the majority of the large pieces off that way.  After quite a bit of work I got it down to this:

print head with plastic residue


It took a little bit more work but eventually I got all the chunks off and out.  At this stage you can see the next problem.  The heater block should be shiny metal instead of goopy plastic.  Because it was so enveloped in the plastic the interior of the blob was quite liquid as the heat couldn't dissipate quickly. The interior plastic was able to seep inside the slot for the heat cartridge (and maybe the thermistor).   The end result is the print head can't reach operating temperature now.  It maxes out at around 170 degrees.  So either there's an insulating layer preventing the block heating up all the way or a layer preventing the thermistor reading correctly.  Either way it doesn't work anymore.   So I've bought a new set of parts direct from Prusa and will be replacing the head end and what ever brackets have to be swapped out as well. 

Monday, November 1, 2021

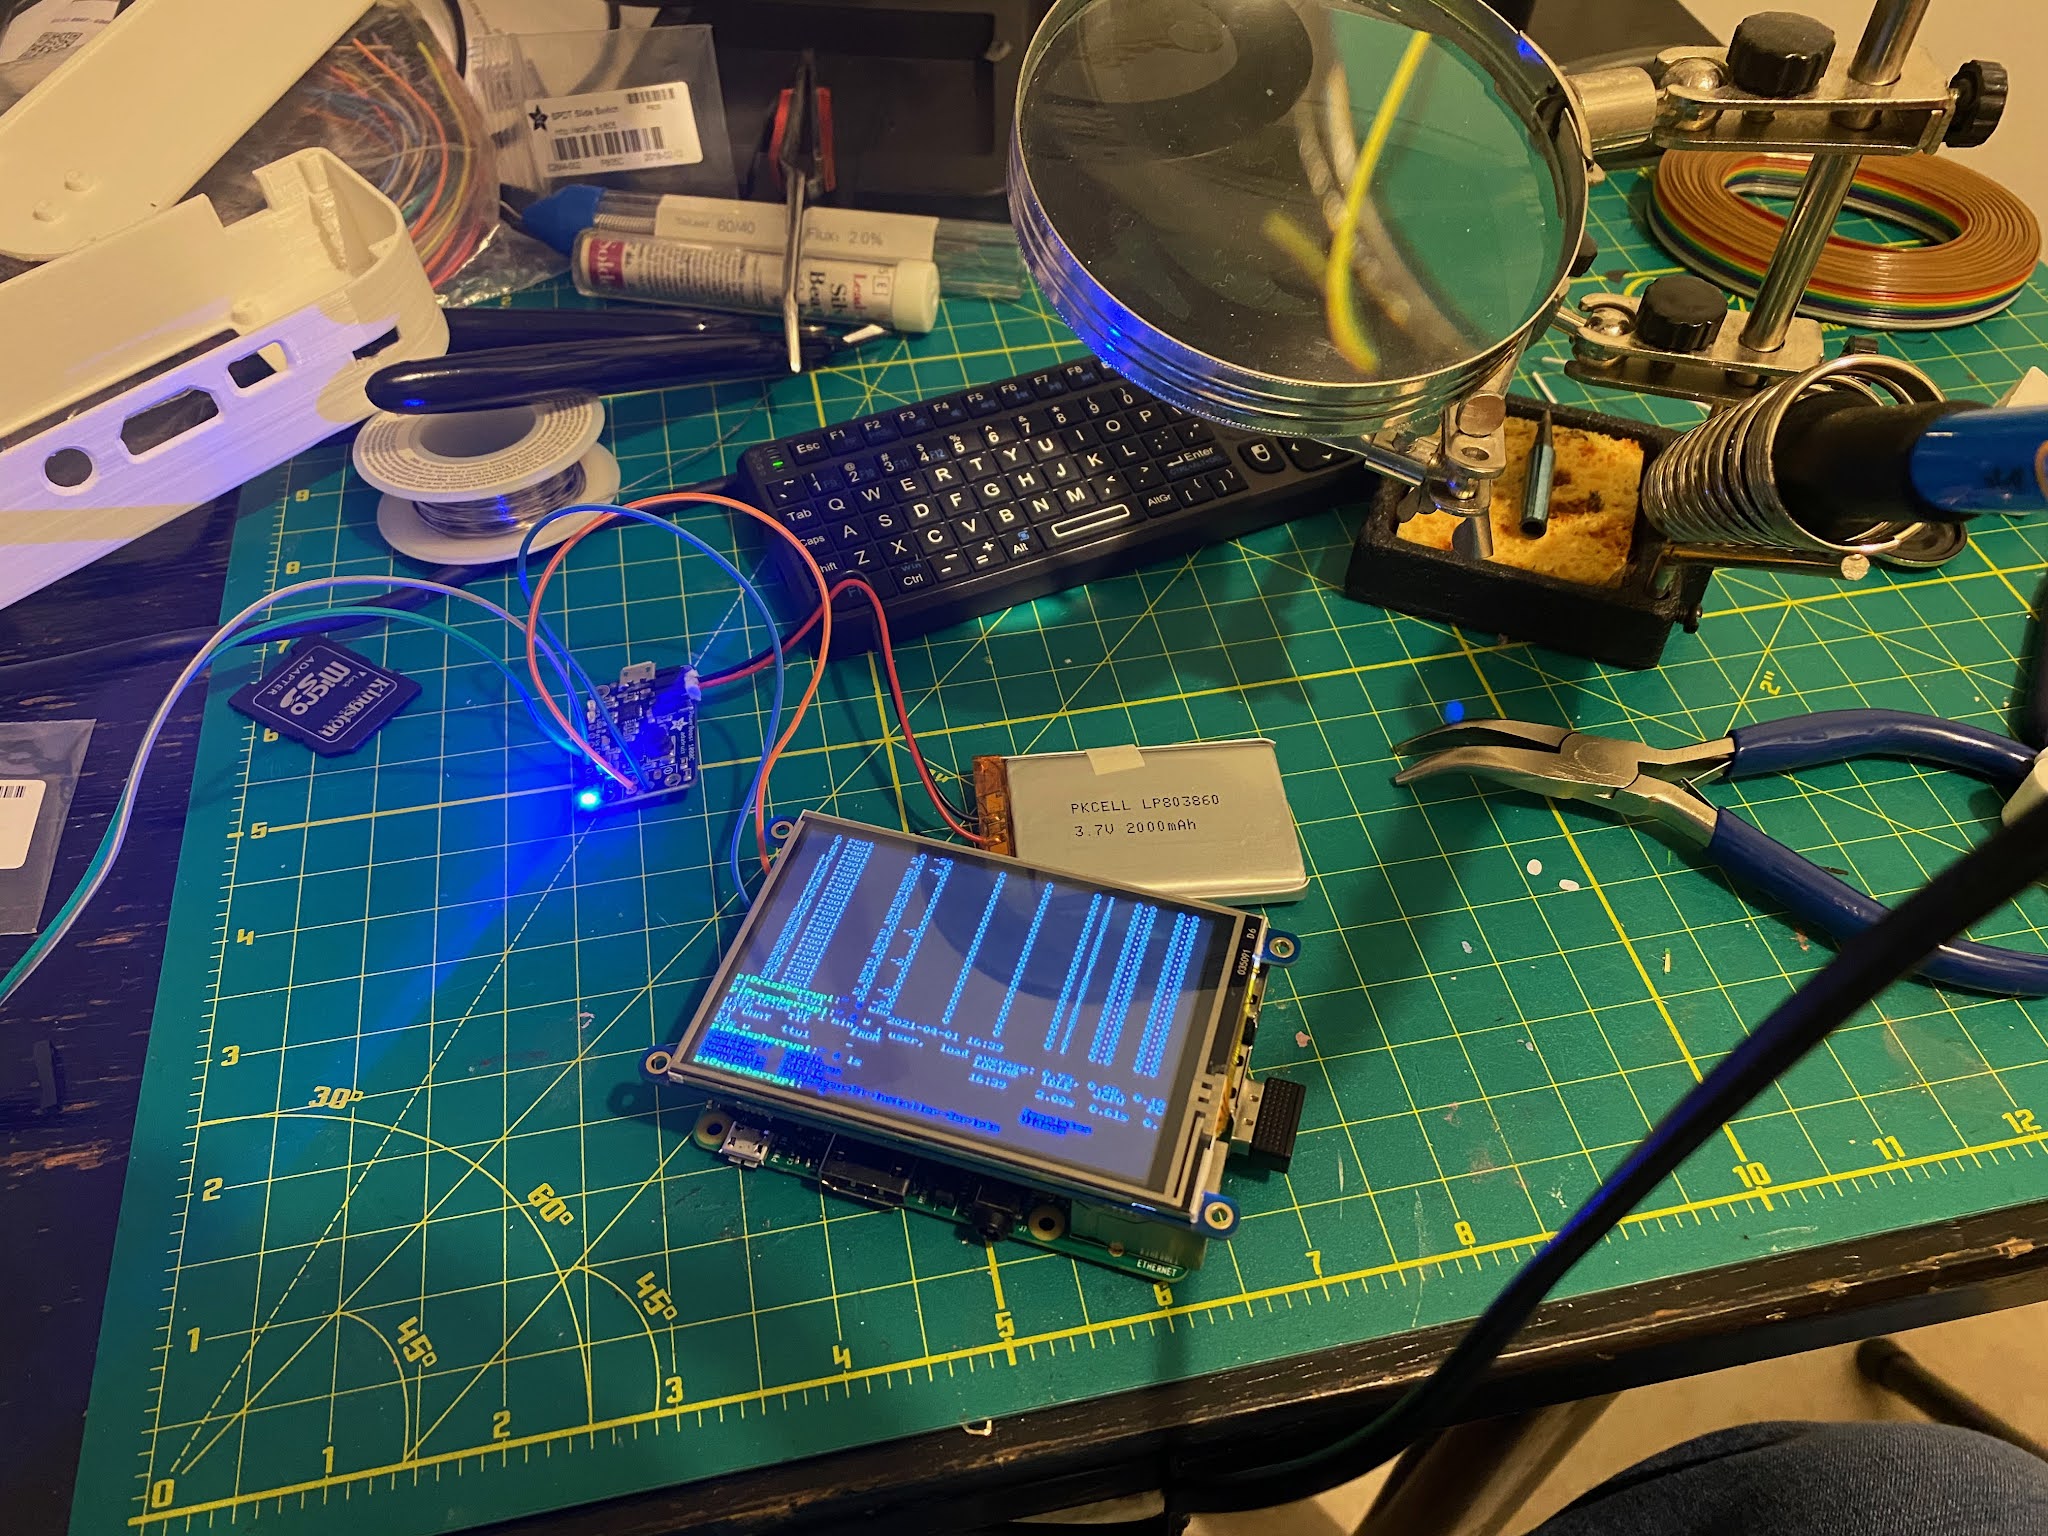
3d printing a Raspberry Pi "laptop" case

 I had some Pi-3's laying around so I thought I'd try to make one of these from the Adafruit learn program: 

https://learn.adafruit.com/mini-raspberry-pi-handheld-notebook-palmtop

The parts list from the Adafruit site:


The funny thing is this list doesn't include the audio amplifier you need later in the guide.  Oh well.  


The STL's printed from my PrusaMini as is.  Getting software working and parts connected turned out to pretty easy.  Not simple mind you, but if you follow the steps, it goes pretty well.


The screw holes aren't sized very well, they're a bit too big. - I used my 3d former pen to fill in the holes and then drilled them to the right size.


Took a few tries to get the adafruit software to work the way I wanted it to, but eventually

sudo python3 adafruit-pitft.py --display=35r --rotation=270 --install-type=fbcp

was the trick to get the screen right side up. 


But it works pretty well.  Takes a while to get used to typing on the small screen.  I don't think I have the eye sight needed to run the gui so I won't even try but it's a nifty little toy.

Thursday, September 16, 2021

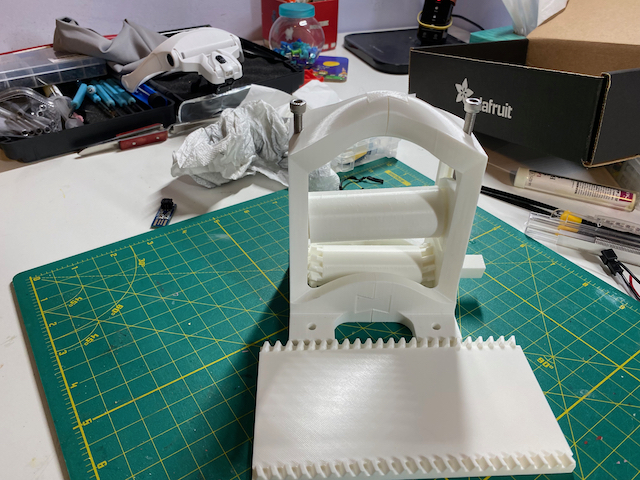
3d printed mini-printing press

 So my daughter found this site:  openpressproject.com that has a small printing press you can 3d print. So I thought I'd give it a go.  I downloaded the stl's from thingverse sliced it up in PrusaSlicer and loaded up in OctoPrint.  The Prusa Mini did an amazing job with it.  It came out quite well and the tolerances for the gears and parts that slide were amazing.   There's an excellent build guide on makezine that can explain it much better than I ever could.  


Intermediate build pic - testing the fit and meshing of the gears.


The assembled press


Not ambitious enough t make this a GIF but it moves smoothly.


The underside of the printing plate showing the gears

Now I have to wait for my daughter to come home from college to try and make some prints with it.  It won't hold up forever - eventually the PLA plastic will give out and need to be replaced but it should be a simple matter of reprinting the part(s) needed.

Wednesday, September 15, 2021

Kitty Paw toe bean macro pad

 I'm catching up on my tinkering projects.  The latest one: Kitty Toe Bean Keypad with Color TFT.  I forgot to take in-progress pictures but here's the final just before assembly shots.  I 3d printed the parts on my Prusa Mini and they came out excellent. Only some minor looseness in the snap-together parts.  The rest of the parts I ordered from Adafruit.com listed in the build guide. 


Pretty happy with how the qtPy soldering turned out


The Kahil Jade switch wiring isn't great, but it works - you have to solder to a pin/post which requires very steady hands to keep it smooth - I do not have steady hands.


Press fit together.  You can see some of my sloppy soldering on the TFT display.


With the Toe Beans installed.


Here's a video of it in action - the original build guild has a dancing parrot as the image, I swapped out pictures of my cat Lola.  Sorry about the vertical filming I wasn't paying attention. 


All in all a fun project - the buttons do CMD+S (save), CMD+X (cut), CMD+C (copy) and CMD+P (paste).  I'll have to open a thread in the adafruit forums as the overall performance is really slow.  I have to hold the button longer than I would expect for it to take the action.  In the video on the build guide you get the impression that it works much faster/smoother than that.  Probably a wiring issue on my part


Monday, July 19, 2021

printing with PETG in my Prusa Mini


So I bought a low-cost spool of OVERTURE 3D PETG from amazon - it was on sale for $21, so I went for it.  First off, Overture's packaging was good and came with a 20cm x 20cm build surface sticker.  It's too big for the mini, but might come in handy with my MonoPrice printer at the office.  It also came with an overture branded ruler/card type thing that's making a nice bookmark in my Foundation and Empire book.  Trying to read them before the series drops on AppleTV+, but I digress. 

My first print was a small tilt box I found on Thingverse.  It came out really well!


It also came off the bed with out any issue (more on that in a few).  

Next up I wanted to print some buckles that would work with some web strapping I have around the house from a previous halloween costume build.  There were a few out there, but this one on the Prusa Prints gallery was the one I went with.  I printed it twice, with supports both times.  Not sure if I needed them or not, but it looked like some of the spans might be too big to cover with out supports.  They came out great and work pretty well.  I left the straps extra long so I can tie a knot if the buckle fails on me just in case.


The only issue I had was taking the brim and support material off the standard prusa mini bed.  It was stuck on like superglue.  I almost scratched the bed trying to get the excess off.  It took some searching to figure out what was different.  In the tilt box case, I let it run over night and took it off the build plate the next morning.  With the buckles, I was printing them back to back and trying to remove them without letting everything become truly cold.  In the various forums I see all kinds of tips and tricks - glue stick, windex, other release agent kind of stuff.   Then I decided to see what the manual said.  Should have started there in hindsight. 

Heatbed: Various manufacturers suggest using various separation (or adhesive) layers for printing PETG, such as Kapton tape, glue stick, etc. Our print sheets work fine without these separation layers but it’s important to know a few basic rules. First, keep the print surface clean. When printing on a smooth sheet, use a window cleaner instead of isopropyl alcohol. Textured powder-coated sheets can be cleaned with IPA. Once you finish printing, let the print cool before you try to remove it from the sheet. 

And there it is. Let it cool completely before removing.  I will probably try using windex to clean the bed next time instead of the alcohol wipes, but other than that, patients will be my go-to move.

Friday, April 30, 2021

Using my 3d pen to weld parts together

 Ok so I was cleaning out my shelf and found a 3d pen I had from a while back.  I think I got it on Woot.com or something like that for super cheap.  They go on clearance at places like Michaels and JoAnn craft stores as well.  Amazon sells a bunch and recommends this one.  Mine is similar, but I don't think it's manufactured anymore. 

So what I didn't realize when I bought it is it uses the same filament as my 3d printer.  It makes total sense now, but I didn't connect the dots at the time.  I put my 3d printer filament in it and it extruded great! which gave me another idea - could I use it to repair, weld or fill a 3d print.  


The short answer is YES! I took two calibration cubes from my 'stuff I printed but is totally useless' box and tried to weld them together.  It worked pretty good!  I would need a lot of practice to get it smooth and neat, but it does work. I also filled in the X, Y and Z recessed letters to see how that would go and just like the weld, I need to practice and I think go slower - my pen has a variable feed rate to help this. I think it'll come in handy for some very specific use cases.


Anyway if you have a 3d print that you want to melt a little more filament onto for repair or aesthetic reasons, these 3d printing pens are a fun and relatively cheap way to go.

Tuesday, March 9, 2021

Got a new 3d printer

So I have a Monoprice Maker Select 3D Printer , which is a clone or re-market of a WanHao Duplicator i3 and have had a generally poor experience with it.  It's 75% on me, to be clear.  I knew it required tinkering and tweaking when I bought it.  I thought I was up to the task, but it turns out I'm not. Mostly due to the time commitment required up front.  That's where I came up short.  I have difficulty putting together the extended blocks of time I would need to make this very capable printer do what I'm looking for. 

prusa box

So I went out and bought myself a Prusa Mini+ (and a spool of  Prusament PLA Prusa Galaxy Black).  I wanted a printer that had a great reputation for easy to use and a large community.  I also wanted something relatively small footprint wise.  Lastly I was factoring price in the overall equation.  

The experience so far has been remarkable.  I had to order it 6 weeks in advance, the demand is so high that you can't really get it immediately.  The shipping from Prague, Czech Republic was amazing.  I received a tracking number Wednesday afternoon (after close local time) and had my printer Friday afternoon.  That includes clearing customs.  Amazing. 

configuration


It was pretty easy to set up and get working. The calibration and configuration is very easy and simple to follow.   I was up in printing in under 2 hours.  Could have been faster had I bothered to read the instructions before I started. The way they handle setting the z-height is amazing.  the auto-bed leveling is also automatic, which is my biggest issue with my old printer.


I printed a new set of knobs for my toaster from thingverse which worked out pretty good so far.


I also printed a support for my Dremel 4000 which is going to come very handy for polishing future prints.

Han Solo blaster receiver


Now I'm starting to print out the parts for a Han Solo blaster for a future costume I intend to build.  I didn't do a good job researching this. I've found alternate and perhaps better builds but this one is what I started with and I'm kind of committed to this.