Thursday, August 25, 2016

Renee's Darth Vader Tie fighter costume 2015.

Decided to write up this year's halloween costume builds.  Before I do that, I want to post about some of the previous costume builds.  I didn't document them as well as I hope to document this year's builds.  

So here's Renee's Darth Vader Tie fighter (Tie Advanced X1).


It's the same idea as Julia's X-wing costume.  It has suspenders for around the neck to have the ship from.  The cape is from my costume and the mask and chest box are from a hasbro toy from e-bay.  The chest box has a lot sound effects - breathing sound and clips from the movies.


I don't have too many intermediate pictures of the Tie.  It had to come together quickly because I was running out of time.  I painted the strip section black then taped over it and the rattle-can sprayed the rest of it gray.  The raised relief of the pilot window was also made free hand.  I cut 8 trapezoids and then angled them up to a circle.  I had to trim a bit here and there to get them to align.


The grey bars are foam tubing you'd use to insulate a door or window frame with, you by like 30' coiled up in a bag at Home Depot for like $4.


The last bit was to take gray pipe insulating foam and stick it to the leading edge.  Originally I was going to make it go all the way around but I had a hard time getting it to stick without straightening out.

Lord Vader is ready to smite the rebelion and get some tasty candy while (s)he's at it.

Julia's Star Wars X-Wing costume, Halloween 2015

Decided to write up this year's halloween costume builds.  Before I do that, I want to post about some of the previous costume builds.  I didn't document them as well as I hope to document this year's builds.  

In 2015 the girls let me make them Star Wars themed costumes.  This was Julia's x-wing costume, complete with an R2D2 droid in the back of the x-wing.


We basically ran out of time to add more details.  I feel like I could have done a bit better but at night out trick or treating it looked pretty good.  Lots of complements.  I scratch built the ship, helmet and vest.  R2D2 was a toy I have (he makes cool sounds and is voice activated).

The x-wing came along pretty good.  I found some large moving boxes in our complexes recycling collection.


So I free-hand cut the pieces out and hot glued them together.  Then I taped the seams with white duct tape.  Next I put some wings on.  I took some mailing tubes and cut them in half to be the engines and started painting the base white coat.


Oh yeah, forgot about the sticks for the guns on the end of the s-foils.  After painting white I masked off and painted a red stripe.  Lastly I put some straps on so she could wear it like suspenders and that was basically it.

Next up the helmet.   I friend, Kevin, had an extra hockey helmet to donate to the cause.  Painted it white and glued craft foam to the side to make it cover the ears.  I also made the ridge down the middle to make it look more like the movie.


Then I took colored electrical tape and sharpie to detail it up, and printed some rebel logos on paper and glued them on.  The visor is a cut up piece of plastic from a paint roller tray liner.


She's already wearing the orange t-shirt we borrowed for the flight suit.  Next we took a white t-shirt and cut the sleeves and neck to look like a vest.  Then we fabric-glued some craft foam to it and drew some flight-suit looking details on with sharpie.


Turned out pretty good all things considered.  The flap hides her candy bucket for trick or treating.


Julia's Costume halloween 2014

Decided to write up this year's halloween costume builds.  Before I do that, I want to post about some of the previous costume builds.  I didn't document them as well as I hope to document this year's builds.

Julia decided she wanted to be a viking, which is pretty simple, we build a shield, Axe and helmet.  Then we buy some fake fur cloth to make a cloak and we're done.  So the helmet was made from a Costco goldfish crackers box with a hot glue gun and Rub-n-Buff paint.

Spray painted it black first, the silver and bronze rub.


The cracking and gaps that let the black show through turned out pretty good.  The 'rivets' are pieces of the hot glue gun sticks.  They didn't stick too well, next time I'll find something better to simulate rivets.


Helmet done, next came a round shield and an axe.  The shield came out great, the axe was a disaster.   Way over sized and the proportions are awful.  Oh well, lesson learned.


The finished costume, complete with fur cloak and boots:


Renee was a storm trooper (we bought the costume) and I was Vader.

A very successful halloween.

Monday, January 25, 2016

Snowzilla timelaps

So we got some snow here.  The forecast projected it's arrival with pretty good accuracy.  Since I had the advance warning, I set up a system to do a time lapse of it.

First thing was to find a camera that could run for 48 hours or more. Looking through my bin of parts and found my old iPhone 4s.  Took a while to get it running 9.2 (not sure that was a wise choice).  This version of iOS is pretty sluggish on an older iPhone.  There's something to the class action lawsuit being filed.

Next up, I needed to find an app to take the photos.  Luckily there's no shortage of apps in the app store to do this. The app Lapse It was free, and well reviewed. So I got it installed and it was amazingly easy to use.


Tap on New Capture:


I tapped on the timer and set it to take a photo every 15 minutes.


I took the defaults for everything else.  You can only do 480p in the free version, to upgrade to 720p or 1080p you have to purchase the pro version.  A fair tradeoff.   Next I had to position the camera.  I went low-tech:


Anyway, the end result:


It turned out pretty good.

Monday, November 16, 2015

I have to rant against PayPay (and a lot of other 'self service/help' docs.

Just venting some frustration with PayPal.

So I moved more than 2 years ago.  I've updated my address everywhere that paypal will let me.  However, I still get my old address filled in by default on websites.  A Lot. It's starting to drive me crazy.

So I open a support email with PayPall via there 'contact' page and vent a little. Not expecting much to happen, but what ever. Their software does some keyword matching and sends me some FAQ's.  Not a bad idea, except they're wrong.

The email says:

How do I update my mailing address?

Here's how to update your street address:

      1. Log into your PayPal account.
      2. Click the settings cog beside "Log out".
      3. Click Update beside "Address."
      4. Click Edit.
      5. Enter your address information and click Save.

If the new address is your home address, click Make Home. If it is a business address, click Make Business.

Here's how to remove your old address:

      1. Log in to your PayPal account.
      2. Click the Profile icon beside "Log out."
      3. Click Update beside "Address."
      4. Find the address you want to remove and click Remove.  

A few things about this.  One the two steps are different. Once says 'click the settings cog' which is right, the second says 'Click the Profile icon' which doesn't exists.  It's on the same page.  Someone didn't bother to proofread.   Now, assuming you figure out that they really meant cog icon, you get this:

There's no Update anywhere on the page!   The only occurrence of the word is a link to "policy updates" which is a footer on every PayPal.com page.   

I'm supposed to trust paypal with my money when they can't get the simple stuff right? As with most companies, it's not a wether you do the right thing in the big moments, but rather if you do them in the small moments.

Anyway, rant over.  I feel slightly better.

Tuesday, September 8, 2015

Locked out of my August smart lock (sorta)

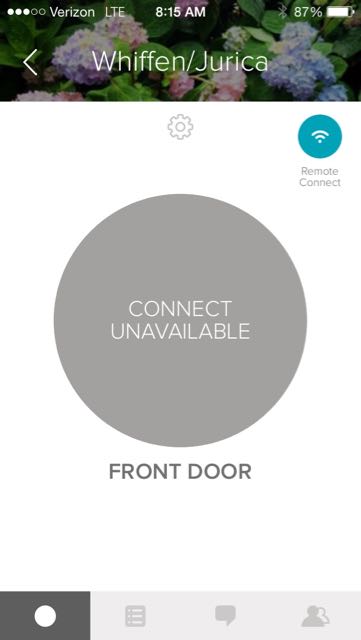
A deliberately salacious headline.  So this morning I had this sneaking suspicion that I forgot to lock the door.  No problem!  I bought a smart lock just to solve this problem!  Open the app, click the wifi button and this is what I see.


GAH! the wifi connect has failed again!  Commute back home from work and sure enough, the red light is blinking.  This is the 3rd time the remote connect has let me down.  It's to the point now where I don't trust it and almost wish I'd never gotten it.

The app needs an upgrade.  It should give me a warning when the WiFI can't phone home.  It should also restart itself if it can't phone home after X hours, where X is a configurable number.  I've sent my suggestions via their support channel, we'll see what they say.

Overall, I'm not as happy as I could be with this setup.  When it works, it's brilliant, but the large size of the nob, the cover falling off when smaller hands try to turn it and now with the issues with the wifi connect cropping up it's harder and harder to recommend this.

Friday, July 24, 2015

Lost another Withings Pulse...

So I lost another Withings Pulse the other day.

It was my forth Pulse over all, and is the second one I lost.

I lost my first one by attaching it to the key pocket on my 5-pocket jeans rather than the waste band.  I did it because I hadn't put my belt on yet.  Proceeded to put my belt on but failed to move it for some reason.  It was Tuesday, election day.  I went in to vote and somewhere on my commute to work, realized I had lost it.  This will become a recurring problem with me.  I wear the thing on my right side, and the seatbelt can knock it loose.

The second one had technical problems and Withins Support was awesome about it and replaced it after a bit of back and forth with them, even though I had bought it second hand.  Top marks to Withings customer support (I have contacted them about other things too, and they did well in those cases also).

The third one went into the ocean with me.  It still works as a pedometer, but the O2 and pulse features are shot and the battery only lasts 4 hours.  Salt water is very hard on electronics as you might have guessed.  I thought it was completely fried, but after drying it out and leaving it for 24 hours, then fully charging it, it came back to life, albeit with limited functionality.

The forth one simply popped out of it's rubber holder, again while getting out of my car I suspect. I had been very lucky with this one.  It went into the pool with me once.  The rubber cover kept it dry enough and it suffered no ill effects.  I had lost it before in a similar fashion, but retracing my steps I always found it.  I retraced my steps this time but it didn't turn up. I suspect someone else found it or I didn't loose it where I parked my car.

So now I'm using my phone to measure my steps which turns out to work ok, since I take my phone with me most places.  I think it might be a little generous with the step counts however.  I'm debating on getting another one.  Going to have to put a saved search on ebay and craigslist.  Maybe if I can score one cheap enough I'll do it again.  I need to find a use for all these Pulse accessories I have...