Monday, July 29, 2024

Accidental 3d printing art

 Every once and a while a print goes wrong and turns into a piece of art unto itself.


This is the print I'm trying to slice and print.  Nothing too crazy about it, except there isn't a lot of bed adhesion.  Add to that PETG's tendency to clump and string when not perfectly dry and you've got a recipe for a failed print.


The print looked kinda neat once I took it off the plate though.


Friday, July 26, 2024

Quick recap of Christmas Tree Project

I'll never make any money as a blogger.  Its never my goal or objective mind you, but it's abundantly clear to me that I could never make a living as a writer.  I just don't do it consistently enough.   These posts are mostly to gather and record my thoughts so I can remember later in life.

So I used NeoPixels to light my Christmas tree a 2022.  I put a post up about it when I was getting started and never followed up.  A lot like my photography posts.  Oh well.  The original post: 

Trying to NeoPixel my Christmas tree part 1

So I started to get it working quite well and had the tree wired up for the season.  I never went on to build the web front end so I could change the lights remotely.  Maybe in a future try.  


I even had enough lights left over to wire the tree in our office:


In both cases I'm running the color wheel code example from the MIT project.  I did make some that did alternate pattersn - like alternating red and green, sparkle/flashes, even did some hand mapping to do it by rows.  All the code is in my XmasTreeLights github repo.  In general it would be better to start with the Matt Parker code, the MIT code or AdaFruit's neopixel tutorials. 


Thursday, July 25, 2024

BBr2 from Michael Baddeley's patreon on my new BambuLabs P1S

For last christmas, on a whim I decided to print a BBr2 (BaByR2) from a patreon I subscribe to: Michael Baddeley (I'm also printing a full size R2, more on that in another post).

So I sold all my camera gear and used the money to buy a BambuLabs P1S with AMS filament changer.  It is an excellent printer.  If you can afford one, get one.  Even the P1P would be a great printer to get.  Speed and quality in a single package that isn't "Prusa" expensive. 


The body came out great on the first try.


The dome prints very well without supports. 


 Printed two legs, some tires and a center foot and it was time to assemble. 


It's a very easy print and pretty easy to assemble with some screws and superglue.  It takes 3 servo motors and somethign to control them.  Since this was my first attempt I went simple with a FlySky FS-I6 from amazon. 


I initially printed the oversized "cartoonish" dome.  I just picked the default dome from the file list.  After gluing and assembling I wired it up to an adafruit crickit to test the dome.  Adafruit makes it super easy to control servos, especially when you're just testing things out. 


I later found the holiday themed dome.  I had some red filament laying around from a previous project idea so it seems a perfect time to test out the AMS.  Turned out excellent!  I bought some "metalic" paint markers from a craft store and started coloring the white in.  


*EDIT/UPDATE* - found the time lapse footage for the Santa hat print:


The AMS does create a lot of waste with the filament changes however:


Later I went back and printed a classic dome in gray PLA and colored it in (still have some more to do)


Super fun project, glad I spent the time on it. Wish I had better hand/eye coordination to paint it better.


Tuesday, July 23, 2024

3d printed Chewbacca Bowcaster


Catching up on my posting - last year I printed myself a Bowcaster for my Chewbacca costume.

The costume was pretty simple.  It started with a onesie I bought at target a while back on a whim.  I added the talking Chewbacca mask and it was pretty much done.  All I needed was the bowcaster.


I found some STLs on Etsy Designed by MysteryMakersStudio - Custom digital DIY Bowcaster with stand stl file(digital download) and I was off and running.   As an aside, Marko Makaj, the designer has a reasonably well priced patreon  as well if you want more than just one model.  It's important to note it's makers plural.

Anyway was off and printing on my new Ender-3 Max Neo 3D Printer.  I don't think I mentioned that yet - should probably post about it too.   I bought it because I wanted the large build area 300x300 and the NEO line with the SonicPad was supposed to be a game changer.  Meh. It prints.


The parts all came out pretty good.


Next came all the gluing.  So. Much. Gluing.   It went together pretty well.  The polarizers (the balls on the end) are a bit heavy for how thick the actual bows are.  I managed drop it and break them off more than once.


One of the tricks I tried in this build was to use UV Resin from my resin printer to fill in the layer lines.  It's very effective but smells pretty bad when you cure it with the UV flashlight. 


fully assembled! (It did drive me to drink.  A little Smith and Cross rum there on the table).


One of the resin printed lenses cracked when I took it off the plate.  I left it as is for "authentic battle damage!"


Primed.  I later used rattle-can gloss black and then some Rub and Buff silver to to make it look metalic.  Came out good enough for me.  


Lots of lessons learned, could do a lot better if I did it all over again.  Now I just need a place to store this bad boy.


Saturday, January 6, 2024

Redoing my lightsaber

 The good folks at Adafruit made a revision to the feather wing light saber. based on their PropMaker RP2040.

The original:

orignal

 The Lightsaber Prop-Maker RP2040 is much smaller and fits better in the hands.


side by side

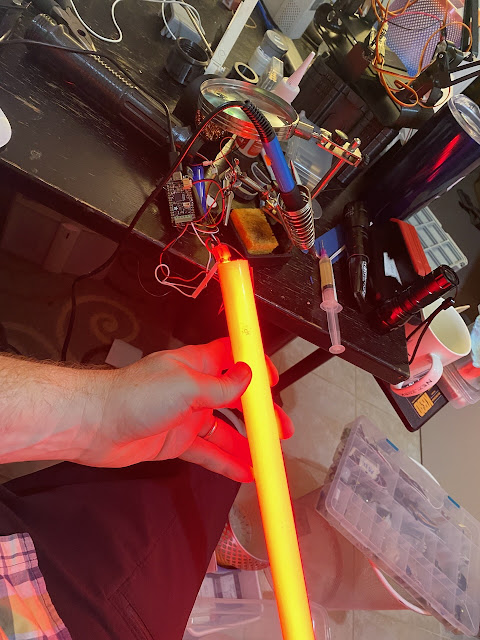
The single feather requires a lot less room than the stacked feather and prop maker feather wing.  I was able to re-use the blade and neopixel strip from the first build.  So I only had to get the prop maker rp2040 and the speaker. 


It worked pretty good straight away


The odd lighting at the end of the saber is from the code not being configured with the right pixel count.


Repairing my Cricut Maker rollers (but barely)

So our Cricut Maker hit the same rubber roller problem that everyone else who seems to own one of these hits eventually.  If you google around for it you can see how often this occurs.  Basically the material the rollers are made of deteriorates and starts to come out of the slots etched in the roller and gets pinched in the casing.  It also will prevent the cutter mat from feeding correctly.   

one of the damaged rollers


New rollers are easy enough to acquire.  You can 3d print them in TPU or buy them from Amazon. Installing them is the tricky part.  There are a bunch of Youtube videos on how to do it so I won't write my own.  The trick is the first set of screws.  There is a plate on the hinge of the cover plate that needs to be pried off so you can remove the screws.  The issue is it seems they glue this piece in place now, making it all-but impossible to service this machine.


I was able to pry it off enough to get the screws out but there are now hairline cracks in the bracket.  I used super glue to add some amount of strength to the cracked surface and am hoping for the best.  The unit does cut now correctly so that part was a success.  

It's really unfortunate that the Cricut company has made these units so unserviceable. They could have done a lot to make the device repairable.  The closed software ecosystem is also a major drawback to this device. I think if I had the purchase to do all over again I'd probably go with a Brother unit or some other non-closed system.


Wednesday, December 28, 2022

Human factors and ergonomics - the door handle

 A few days ago I went to a play at  Woolly Mammoth Theatre Company It was a one mane show called Just For Us by Alex Edelman.  Good show, enjoyed myself.  That's not what this is about though.  it's about the bathroom stall doors:

Door handle


If you saw that door handle, what would you assume?  


I assumed that it was vacant via the green indicator - which was correct.  

I assumed I should put my fingers under the lip and pull the door open.  It didn't move.  I went to the next stall that was green.   Wouldn't open.  Then I tried to push the door and it opened. 

Wikipedia defines Human factors and Ergonomics as:

Human factors and ergonomics (commonly referred to as human factors) is the application of psychological and physiological principles to the engineering and design of products, processes, and systems. Four primary goals of human factors learning are to reduce human error, increase productivity, and enhance safety, system availability, and comfort with a specific focus on the interaction between the human and the engineered system.

 Not sure this succeeded on the human error front.  There isn't a visual indicator to tell me to push.  I can contrive a scenario where someone is assisting someone and needs to pull the door shut and therefor needs the pull handle but I'm not sure that was the rationale there. 

On a plus side, there are no gendered bathrooms at this theater.  A trend I hope spreads.  Full floor to ceiling stalls where everyone gets privacy.  It just seems like a more efficient use of limited plumbing space.  One line for everyone.